Rubbermaid Stock Tank Drain Valve Installation for the Indoor Aquaponics System

Amazon Deals of the Day

When I bought the 100 Gallon Rubbermaid Stock Tank for my aquaponics system, I decided to remove the drain plug and install a valve instead.  This will allow me to attach a garden hose to the tank and drain it out the door of the quail house easily if necessary.

Of course the threads for the drain valve were much larger than a standard garden hose fitting, so I needed a reducer.  I searched around online and had a hard time figuring out what size thread the drain plug was.  So I just took the bulkhead out and brought it to a hardware store and found what fit.

Get a 1 1/4″ x 3/4″ reducer.  That will fit into the bulkhead where the drain plug was.  Then you can simply screw in a valve of your choice.  I chose a boiler valve since it’s short and won’t stick out too far where I’d trip over it.

Here’s how to install it.

Amazon Deals of the Day

Lighting for the Indoor Aquaponics System

Amazon Deals of the Day

LIGHTING
Growing plants indoors means you will need to provide them some artificial lighting.

For my set-up for now, I have one 4 foot long DuroLux T-5 florescent light fixture hanging.  This is more than enough for a 3 foot x 4 foot grow bed.

T5 Grow Light

This fixture came with four T5 bulbs, chains to hang it, an on/off switch that toggles so you can have 2 or 4 bulbs lit, and a nice, long power cord.  It produces 20,000 lumens.  It also has an outlet on the housing so you can plug another light into it and daisy chain them together, which is handy because you’ll have these on a timer.  Overall, I found this to the best value and it has a 4 Star rating.  It’s $81.99 with Free Amazon Prime Shipping.

The bulbs it came with are 6,500 Kelvin which means they are the right light spectrum for vegetative grown.   The 6,500 Kelvin spectrum basically mimics sunlight during daytime hours and has a slight bluish hue to it.  Leafy greens like lettuce, basil and green onions thrive under these lamps.

I also bought a 5-pack of spare bulbs for when one inevitably burns out.  Again I went with what seemed like the best value and had at least a 4 Star rating:  iPower T5 6400K Grow Light Bulbs, 5-Pack.  These are 6,400 Kelvin bulbs – basically the same thing as the bulbs that came with the DuroLux unit.  They’re rated to last 10,000 hours, so I think I’ll be good on bulbs for a while.  The 5-pack is $22.54 with Free Amazon Prime Shipping.

T5 Bulbs

If you want to grow fruiting veggies like tomatoes or peppers, you’ll want to get bulbs in the 3,000 Kelvin spectrum, like these:  Vivosun 3000K T5 Grow Light Bulbs, 5-Pack.  The 3,000 Kelvin spectrum is a warmer, redder light that promotes fruiting and budding.  $22.95 with Free Amazon Prime Shipping.

Vivosun 3000K

Since I have 2 of the 21 gallon mixing tray beds, I plan on getting another DuroLux fixture so each bed has their own:  one bed for leafy greens and one for fruiting veggies.

Amazon Deals of the Day


Humidity Control in the Indoor Aquaponics Grow Space

Amazon Deals of the Day

HUMIDITY
When I built this thing, I knew that I would have to come up with something to deal with the humidity in the room.  With just the quail in there I’d get frost on the windows when it got cold.  Add a 100 gallon tank of warm water….yeah, humidity.

There are two windows and a big sliding glass door in the quail house, so they get all wet from dew building up on them.  Wet wood is a long term problem so this needed to be addressed right away.

My solution was to install a vent fan (like a bathroom ceiling fan) in one of the windows and connect that to a dehumidistat.  I got the vent fan at an Ace Hardware store for about $18.  The dehumidistat turns the fan on if the humidity in the room is too high and turns it off when it’s low enough.  You can adjust the humidity level just like you do with your thermostat for temperature in your house – just turn the dial.  Very cool, and it works great.  Easy to install too and it came with great instructions.

I got a Broan-NuTone DH100W Dehumidistat to do the job, and it’s doing it well.  4 Star rating and $15.99 with Free Prime Shipping (it was $25 at Home Depot).

Broan Dehumidistat

Here you can see my sophisticated venting solution, LOL.  I just took some scrap wood and screwed the vent fan to it. Then I routed the vent out of the window and filled the gap with an old pillow.  I will fabricate a more elegant installation and insulate the plywood eventually.

vent 2

We had a week or so of below zero temps here and I had practically no dew build up – just a little in a few corners of a window.  We get that in the house sometimes when it’s really cold so I call that a win.

I have the unit set at 50% humidity right now.  In the summer months I’ll bump that up or even turn it off completely when I can have the windows open.

Amazon Deals of the Day

Indoor Aquaponics Update

Amazon Deals of the Day

I’ve had this aquaponics system working in my quail house for a while now and it’s working out quite well.  I have basil, green onion, lettuce and garlic growing like crazy now in the ebb and flow bed.

bed 2.26

I started a wicking bed and planted a bunch of seeds:  bok choy, tomato, lettuce, cabbage, broccoli, carrot, onion, pea and basil.  The bok choy, lettuce and broccoli went totally nuts sprouting right away. I’ll definitely have to thin the herd there eventually. The cabbage is going awesome now. Yesterday the carrots and onions sprouted, and there are lots of sprouts. I only got 3 tomato and 1 bell pepper sprouts, but I have more seeds so they’ll go in soon. 3 of the 4 pea seeds sprouted also.

Some new videos will be coming soon, showing you how things are set up and the progress with growing stuff.

I’m doing all of this in the Colorado mountains in the dead of winter.  We have had several days of below zero temperatures here in February and I have seeds sprouting – so cool!

Amazon Deals of the Day


Indoor Aquaponics in the Bird House!

Amazon Deals of the Day

Veggies and Fish are Growing in the Quail House!

I’m building an aquaponics system in the bird house.  Here’s the progress so far.

Here’s some of the equipment that I’m using that you can get from Amazon. All have 4 Star customer reviews or better, and all ship free with Amazon Prime.

Rubbermaid 100 Gallon Stock Tank  $155.00
Practically indestructible and the perfect size for my system.  If you have a Tractor Supply near you, you can get these there much cheaper than at Amazon.  I added the link so you can see the description, dimensions, etc.

DuroLux T5 High Output Grow Light (4ft 4 lamps) $81.99
20,000 Lumens.  It comes with four 6500K bulbs.  See my post on Lighting for the Indoor Aquaponics System

Eheim Jager 250W TruTemp Submersible Heater 17” $37.48
This tank heater is good for tanks up to 265 gallons. Eheim Jager has a great reputation.

Active Aqua Submersible Water Pump, 1000 GPH $51.99
I decided to go with a bit more pump than I need right now since I may expand the system in the future. Better to have more pump than you need than not enough.

API MASTER TEST KIT (Aquarium Water Test Kit) $21.99
Excellent test kit. I’ll be able to use this for years before needing to replace any of the chemicals.

CPR Aquatic 4 Count Slip by Slip ABS Bulkheads for Aquarium Filters, 1-Inch $14.47
Four 1-inch bulkheads for less than $15 is a great deal. Similar bulkheads go for $8.00 EACH at Tractor Supply. 2 inch PVC pipe fits snugly over the top of these making them perfect for standpipes.

Just about everything else for the system I got at Home Depot, Lowes or Ace Hardware.

Amazon Deals of the Day

Emergency Fuel Storage

It’s a good idea to keep some extra fuel around in case there’s a situation where you can’t simply buy some at the gas station.  Remember Hurricane Sandy?  There were pictures and videos of people walking around with gas cans trying to find fuel to run their generators.  Seriously?  You have an expensive generator, but no fuel to run the thing?

So, what is a good way to store fuel so it’s there if you need it?  Here’s what I do:

Each month, buy a 5 gallon gas can.  I have found the cheapest gas cans at Walmart for about $12-$13 when they’re on sale.  If I had an Amazon recommendation for you I’d share it, but Walmart seems to be the cheapest.  And don’t worry about the quality of the cans so much.  As long as they seal tight, you’re good.  You can get $50 NATO 5-gallon Jerry cans if you want, but these cans will just be sitting in storage.  They really won’t be tossed into the backs of pickups and rolled around, etc.

Fill that gas can at the gas station.  Label it according to what month you filled it.  For example, if you fill you first gas can in February, take a Sharpie and write “FEB” or “2” on it so that you keep track of when you filled them.

Each month, do the same thing:  buy a can, fill it, label it.  If you do this for a whole year, you’ll have twelve 5-gallon cans, or 60 gallons of fuel.  Store the cans in a safe place, of course, like a garage or a shed.  I wouldn’t keep these on your balcony if you live in a condo.

When you get to the month that you started (February in this example), simply take the gas can, pour that fuel into your vehicle, and fill the can back up at the gas station.  Do this each month.

The beauty of this is that you won’t spend  any extra money for the fuel that is stored after the first year.  The 5 gallons that you refilled the gas can with would have just went into your vehicle anyway.

It’s a good idea to add some fuel stabilizer to make sure your fuel doesn’t go bad.  If you only have 12 cans and you cycle through them each month you’ll probably be fine.  But I like to give myself a little insurance and add some Sta-Bil fuel stabilizer.
sta-bil

On Amazon it’s $10.50 for 32 ounces of this stuff delivered in 2 days with Free Prime Shipping – that’s an awesome deal.  You only need 2 ounces per 5-gallon can of gasoline, so one bottle of Sta-Bil will last quite a while.

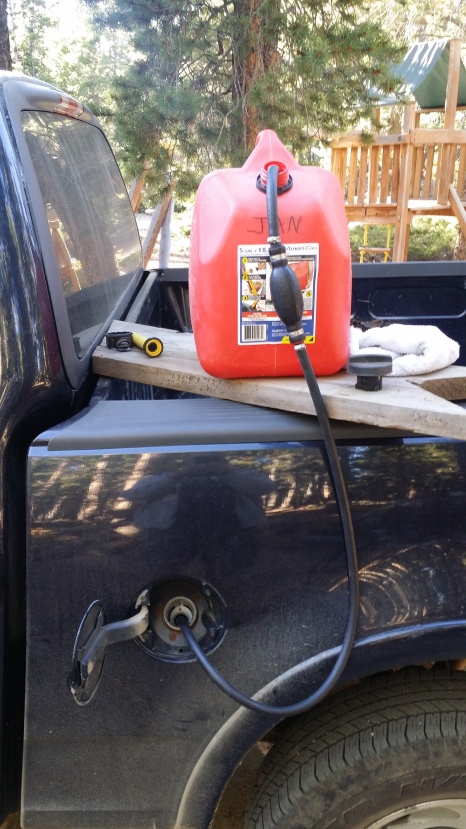
To make the process of transferring your fuel from the gas can to the vehicle much easier, I recommend you read this post on how I do it.  It will make the job much simpler and if it’s simple, you’ll do it.  If it’s a pain, you won’t.

Try Amazon Prime 30-Day Free Trial

Moeller Primer Bulb

I keep an emergency supply of gasoline at the house “just in case”.  Right now I have six 5-gallon gas cans.  I will have 12 cans eventually – one for each month.

Each month I take one of the cans and pour it into my truck, then fill it back up when I go to the gas station.   It costs me no extra money.  I would have gotten that 5 gallons from the gas station anyway.  Read my Emergency Fuel Storage post for more on my storage system.

I got really tired of trying to use the new EPA approved spouts on the new gas cans.  Have you seen these things? They are worthless and you spill a lot of gas.  So much for being good for the environment.  I ended up just using a funnel, but that was a pain too.

So I got one of these:moeller-primer-bulb-pic

It’s a Moeller Fuel Primer Bulb.  It’s $20.78 at Amazon with Free Prime Shipping.  Here it is in the packaging:
moeller-primer-bulb

There are cheaper primer bulbs out there but based on reviews, I just thought a few extra bucks was worth it for this item.

You will need to buy some 3/8″ fuel line and 2 small clamps as well ($10 or so).  I would just get these at your local hardware store.  I got 6 feet of fuel line and cut 2 feet off.  The short piece is attached to the inlet side of the primer bulb and the long piece is attached to the outlet side.  Put a clamp on each line to secure them to the primer bulb and you’re done.  It took me about 2 minutes to do this, if that.
moeller-primer-bulb-fuel-line-and-clamps

It works like this: stick the short end of the fuel line into the gas can.  Stick the long end into the gas tank of your vehicle.  Squeeze the primer bulb a few times and it primes the fuel line so the fuel will just gravity feed into you gas tank.  Your gas can has to be above your gas tank, of course.  I’ll post of video of me doing this soon.
fueling-the-truck

This works awesome!  No more spilled gas or trying to hold 5 gallons of fuel while pouring it into a funnel.  I just prime it and when the fuel starts to flow I walk away and do something else.  When I come back later – done.  And no mess.

Shop Amazon – DIY Event

An Introduction to Product Reviews

“Oh shit, he’s gonna push products on us now….LOL”.  No.  If you’ve seen my posts, I really haven’t “pushed” anything.  If I have a product link in a post to Amazon, yeah it’s an affiliate link.  And you don’t pay any more for it if you decide to click and buy this item than you would if you found it yourself, so why not?  Every penny helps support the birds.

I will not post a product review of ANYTHING that I have not tried and used myself.  If I try something that is garbage, I’ll share that too.

And a lot of this won’t even be quail related, but my guess is that anyone raising quail for meat and eggs will understand.

If you are like me, you are prepared for sudden losses of power, communication, food distribution, etc. – like from a hurricane, an ice storm, a tornado, an earthquake, a forest fire, etc.  We all live in areas that are vulnerable to some sort of short term (and maybe long term) disturbances that can make life difficult or at least uncomfortable.

If you are not prepared for these things, you should be.  I’m not talking about building an underground bunker that can withstand an EMP blowing up the entire power grid of the United States, a global pandemic killing 90% of the population or storing 20 years worth of MREs.  That crap is for the “Doomsday Prepper” bullshit reality shows on TV.  What garbage!

Look.  I live at high elevation in the mountains and have had 7 foot snowstorms that socked me into my house for 7 days with no chance of getting anywhere on foot or by vehicle and -50 (50 below zero  F) spells that last for days.  It’s September right now and I have been going crazy building my firewood stack so I am SURE that we have enough wood to get through the winter comfortably.  And by “comfortably” I mean that we have more than we need, just in case.

Does that mean that I’m a “crazy prepper”?  I think not.  It means that I am a responsible husband and father that wants to ensure that his family is safe and comfortable.

Being prepared for other things just in case of an emergency is vital as well.

Anyway, I’m rambling.  I just thought that I’d show you guys some things that I am using around our place to make our lives easier and some “just in case” products.  Some quail stuff too.

Shop Amazon – DIY Event